Search vs Custom Search
Old interface: Settings > Basic > Let search engines find your blog = Yes.
New interface: Settings > Basic > Privacy - edit > Let search engines find your blog = Yes
However if you want more control over how the search in your blog works or if you are an AdSense publisher and want to (potentially) earn revenue from ads on the results page then you need to use a Custom Search Engine. (Or some other non-Google search engine might work too - but it's not what I'm covering in this article.)
A Custom Search Engine (CSE) is like a specialised widget: you log into the CSE-editor and set up the search options, and then are given some code to put into your blog. Setting up the options and putting the code into your blog isn't hard, but you do need to do a few specific steps to make sure the code you are given that works inside Blogger.
If you use a CSE, as well as getting a share of the AdSense earnings, you can also customize the search, eg by searching more than just the one site, turning auto-suggestion on, modifying searches with additional keyworks, adding refinements, changing the layout of results, etc.
Creating your Custom Search Engine
Follow these steps to make your own search tool, and install it into your blog.
Log in:
1 Go to Google's custom-search-engine application
2 Log in with the Google account that owns the blog
You can transfer a blog from one Google account to another one. But there is not currently any way to transfer ownership of a CSE between Google accounts. So if there is any chance that you might want to hand the blog over to someone else in the future, it's a good idea to make sure that items like this are owned by a Google account that can go with it.
3 Click the Create a Custom Search Engine button (currently a very large button near the top right of the screen)
Start your CSE:
4 A simple wizard opens, to help you create the CSE. Fill in these fields on the first screen:
- Name - what you will know it as
- Description - describe what it's about (mostly so you know later on, I think)
- Language - if your blog isn't in English, it's important to change this to the correct language, so that the search works correctly.
- Sites to search:
Enter your blog's URL.
Put www. at the beginning, and /* at the end (this says to search all of your blog, not just the home page) .
Example, the sites-list for the search on this blog is www.blogger-hints-and-tips.blogspot.com/*
- Edition - unless you are willing to pay $US100/year, you need to select Standard edition.
This displays Ads-by-Google on the search results page. But if you are an AdSense publisher you can link these ads to your account and earn revenue if they are clicked on.
6 Choose a Style
7 Test the search:
- Enter a search-term
- Click the Search button
- On the screen, check that the search looks and works ok. If not, search for words from a post entered several weeks ago, in case Google is behind in indexing your blog.
- If necessary, go back and make changes.
You can choose different themes for the search results without re-running the test-search: just click a theme and wait a second or two for the screen to re-draw.
8 Create the CSE by clicking Next
At this point, the CSE-editor makes you think that you can use the HTML that is shown. However there is more customising that you can do - and more that you must do if your CSE is going into a site created with Blogger.
Customize your CSE:
9 Click any of the options in the list to go to the CSE Control Panel for your Google account. In this Control Panel:
- The Basics and Sites tabs have a little more information than was in the set-up wizard, but you do not need to change them
- Refinements and Promotions let you add extra functions to your search. They are not needed for a standard blog-search. Refer to Google's documentation (available from the tabs) for more about them.
- Synonyms lets you upload a customised set of word-combinations that should be treated as equivalent in your search.
For example, in Blogger-hints-and-tips if I always use the word "gadget" in posts, it would be sensible for me to upload "widgets" and "page elements" as synonyms since they mean the same thing, and are terms that people are likely to search for. However even though it would be sensible, I haven't actually uploaded this list, and the custom-search here seems to work well enough.
- Autocomplete offers searches similar to the one your reader (appears to be) typing: by default it's turned off, but if people who search your site a used to standard Google search (which now has it on) then it may be good to turn it on.
You also have an option to manually include or exclude certain auto-complete patterns could be useful if your blog is in a niche with very specific terms for which the standard auto-complete option is totally wrong.
- Look and feel: this is is essential for custom-searches that are to be used in Blogger.
Firstly, you need to choose a layout: I've described the options for CSE screen layout for people who needed to convert existing CSEs to the most recent layout options, but the notes there will help you see what layout might be right for your blog.
Second, under Choose or Customize a Style, you may choose a style: by default it's set to the value you picked in the wizard. There is also a Customize button, and this let you edit a number of features including the colours, how the Google brand is shown, and whether or not a logo is shown at the top of the search results.
- Make Money:
If you don't already have an AdSense account, you can apply for one from here. Because you will be using AdSense for Search, rather than AdSense for content, the rules and processes are a little different to those for joining AdSense for your blog.
If you have an AdSense account on the Google account that's making the CSE, then this connection is easy - just turn it on.
If your AdSense account is associated with another Google account, then you need to make the connection by entering the Google Account ID and certain other information that you've previously associated with the account, like phone number and postal code.: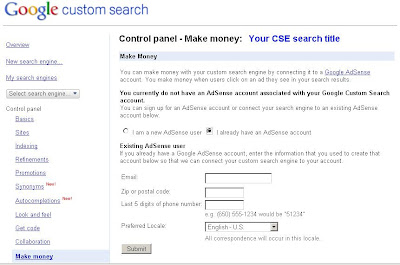

Install:
10 Once all the customization is done, choose the Get Code tab. Copy the HTML that is shown, and install it into your blog - either into an HTML gadget, or into a Post or Page.
Related Articles:
Putting HTML from a 3rd party into your blog
Transferring a blog from one Google account to another
Setting up AdSense on your Blog
Showing image-only AdSense ads in your Blog
Finding a picture's URL in Picasa-web-albums.
0 comments:
Post a Comment